Battery switch on travel trailer function is crucial for managing your RV’s power. Understanding how these switches work—whether it’s a simple 1-2-both or a more complex system—is key to safe and efficient power management. This guide will walk you through different switch types, safe connection procedures, troubleshooting common issues, and essential maintenance tips to keep your travel trailer running smoothly.
We’ll cover everything from the internal workings of various battery switch designs to integrating your switch with other electrical components like solar panels and inverters. Learn how to prevent costly mistakes and ensure your battery system is always ready for your next adventure.
Battery Switch Types in Travel Trailers
Choosing the right battery switch for your travel trailer is crucial for managing your power sources effectively and preventing accidental drain. Understanding the different types available will help you make an informed decision based on your needs and budget. This section will detail the common types, their inner workings, and their respective advantages and disadvantages.
Battery Switch Types and Functionality
Travel trailers typically use battery switches to isolate and control the flow of power between your house batteries (used for interior lights, appliances, etc.) and your tow vehicle’s charging system or shore power. The most common types are the 1-2-Both and the 1-2-Off switches. Less common, but still used, are simple on/off switches for each battery.
| Switch Type | Function | Wiring Diagram | Advantages/Disadvantages | ||||||||||||||||||||
|---|---|---|---|---|---|---|---|---|---|---|---|---|---|---|---|---|---|---|---|---|---|---|---|
| 1-2-Both | Connects either battery 1, battery 2, or both batteries to the load simultaneously. |
|
Advantages: Versatile, allows charging both batteries simultaneously, easy to use. Disadvantages: Slightly more complex wiring. | ||||||||||||||||||||
| 1-2-Off | Connects either battery 1, battery 2, or isolates both batteries from the load. |
|
Advantages: Complete isolation of batteries, prevents accidental drain. Disadvantages: Requires more steps to use. | ||||||||||||||||||||
| Individual On/Off Switches (per battery) | Each battery has its own on/off switch, allowing independent control. |
|
Advantages: Simple, inexpensive. Disadvantages: Less versatile, cannot charge both batteries simultaneously. |
Comparison of Battery Switch Types
The choice between these switch types depends largely on individual needs and priorities. The 1-2-Both switch offers convenience and the ability to charge both batteries simultaneously, making it suitable for users who prioritize ease of use. The 1-2-Off switch provides superior battery protection by allowing complete isolation, which is beneficial for extended storage or preventing accidental discharge. The individual on/off switches are the simplest and most cost-effective option, but lack the versatility of the other two types.
Reliability is generally similar across all types, provided they are properly installed and maintained. Cost generally increases with complexity, with the 1-2-Both switch usually being the most expensive and the individual switches the least expensive.
Connecting and Disconnecting Batteries

Safely connecting and disconnecting your travel trailer’s batteries is crucial for preventing damage to your battery system and avoiding electrical shocks. A battery switch makes this process much easier and safer, but proper technique is still essential. This section will guide you through the steps, emphasizing safety best practices.Connecting and disconnecting your batteries involves a straightforward process, but careful attention to detail is vital to ensure safety and prevent damage.
Always remember that working with batteries involves a risk of electrical shock and potential for burns from acid, so approach the task with caution and respect.
Safe Battery Connection Procedure
Before you begin, ensure the battery switch is in the “OFF” position. This prevents accidental shorts or connections. The following steps Artikel a safe connection process:
- Inspect the Connections: Carefully examine all battery terminals and switch connections for corrosion, loose wires, or any damage. Clean any corrosion using a wire brush and baking soda solution.
- Prepare the Switch: Turn the battery switch to the “OFF” position.
- Connect the Positive Terminal (+): Connect the positive (+) cable to the positive (+) terminal of the battery. Use a wrench to tighten the connection securely, ensuring a good, firm contact.
- Connect the Negative Terminal (-): Connect the negative (-) cable to the negative (-) terminal of the battery. Again, ensure a tight connection.
- Turn on the Switch: Once both connections are secure, carefully turn the battery switch to the “ON” position.
Safe Battery Disconnection Procedure
Disconnecting the batteries is just as important as connecting them correctly. A reversed procedure can lead to sparks or damage. Here’s how to safely disconnect:
- Turn off the Switch: Begin by turning the battery switch to the “OFF” position. This breaks the circuit and prevents any unexpected current flow.
- Disconnect the Negative Terminal (-): Always disconnect the negative (-) cable first. This minimizes the risk of accidental short circuits.
- Disconnect the Positive Terminal (+): Next, disconnect the positive (+) cable from the positive (+) terminal.
Preventing Accidental Shorts and Damage
Accidental shorts can cause sparks, damage to the battery system, and even fire. The following practices help minimize risk:
- Keep Cables Away from Metal: When connecting or disconnecting cables, ensure they don’t come into contact with any metal parts of the trailer or other conductive materials. This prevents accidental shorts.
- Use Insulated Tools: Employ insulated tools such as wrenches and pliers to avoid accidental shocks.
- Work in a Well-Ventilated Area: Battery fumes can be harmful. Always work in a well-ventilated area to prevent inhalation of dangerous gases.
- Wear Safety Glasses: Protective eyewear will shield your eyes from potential splashes of battery acid.
- Clean Terminals Regularly: Regular cleaning of battery terminals helps prevent corrosion, which can lead to poor connections and overheating.
Grounding and Battery Switch Functionality
Proper grounding is essential for the safe and efficient operation of your battery switch and the entire electrical system. The ground wire provides a return path for the current, completing the electrical circuit. Without a good ground connection, the system may not function correctly, and you could experience problems with electrical appliances or even damage to the battery system.
A poor ground can also increase the risk of electrical shocks. Ensure your battery’s negative terminal is correctly grounded to the trailer’s chassis. A corroded or loose ground connection can mimic the effects of a bad battery switch.
Troubleshooting Common Battery Switch Issues
Dealing with a malfunctioning battery switch in your travel trailer can be frustrating, but systematic troubleshooting can often pinpoint the problem quickly. This section will guide you through identifying common issues and resolving them efficiently. Remember safety first – always disconnect the battery before working on the switch or wiring.
So, you’re planning a trip? Awesome! Don’t forget travel insurance – it’s a lifesaver. Check out Aon travel insurance for comprehensive coverage; they’ve got you covered for pretty much anything. And if you’re looking for another solid option, Aon travel insurance also offers great plans, so compare and choose what best suits your needs and budget before you jet off!
Battery switch problems typically manifest as complete power loss, intermittent power, or blown fuses. Understanding the potential causes for each problem is key to a swift resolution.
Causes of No Power from the Battery Switch
A complete lack of power from your battery switch points to a more serious problem than intermittent issues. Several factors could be responsible, requiring careful investigation.
- Faulty Switch: The switch itself might be internally damaged or broken. This is common after years of use and exposure to the elements. A simple visual inspection might reveal a broken lever or corroded contacts.
- Blown Fuse: Check the fuse protecting the battery switch circuit. A blown fuse is often indicated by a broken filament inside the fuse. Replace it with a fuse of the same amperage rating.
- Loose or Corroded Connections: Examine all connections at the switch, battery terminals, and any associated wiring. Corrosion can impede current flow. Clean connections with a wire brush and apply dielectric grease to prevent future corrosion.
- Damaged Wiring: Inspect the wiring leading to and from the switch for any cuts, fraying, or damage. Repair or replace any damaged wiring.
- Dead Battery: Before assuming a switch problem, verify the battery is charged. Use a multimeter to check the battery voltage.
Causes of Intermittent Power from the Battery Switch
Intermittent power suggests a less straightforward problem, often involving loose connections or partial failures.
- Loose Connections: Vibration from travel can loosen connections at the switch or battery terminals. Tighten all connections securely.
- Corroded Connections: Even a small amount of corrosion can cause intermittent power. Thoroughly clean all connections and apply dielectric grease.
- Worn Switch Contacts: Over time, the contacts within the switch can wear down, leading to inconsistent contact and intermittent power. Replacing the switch is usually the best solution.
- Wiring Issues: A partially damaged wire, perhaps due to chafing or rodent damage, can cause intermittent power flow. Carefully inspect all wiring.
Causes of Blown Fuses Associated with the Battery Switch
Blown fuses indicate an overcurrent situation – too much current flowing through the circuit. This is a crucial safety feature, and investigating the cause is vital.
- Short Circuit: A short circuit in the wiring, often caused by damaged insulation, will draw excessive current, blowing the fuse. Inspect all wiring carefully for shorts.
- Overloaded Circuit: Too many appliances drawing power from the same circuit can overload it and blow the fuse. Check your circuit loads and consider adding additional circuits if necessary.
- Faulty Appliance: A faulty appliance can draw excessive current and blow the fuse. Check each appliance connected to the circuit.
Troubleshooting Flowchart
This flowchart will help you systematically troubleshoot your battery switch problems.
Problem: No Power
- Check the battery voltage. Is it charged? Yes -> Go to step 2. No -> Charge the battery.
- Check the fuse. Is it blown? Yes -> Replace the fuse and check again. No -> Go to step 3.
- Inspect all connections for corrosion or looseness. Clean and tighten as needed. Check for power.
- Visually inspect the switch and wiring for damage. Repair or replace as needed.
Problem: Intermittent Power
- Check all connections for looseness or corrosion. Clean and tighten securely.
- Visually inspect the switch and wiring for damage. Repair or replace as needed.
- Test the switch with a multimeter to check for continuity.
Problem: Blown Fuse
- Replace the fuse.
- Identify the cause of the overload (short circuit, overloaded circuit, faulty appliance).
- Repair the short circuit, reduce the circuit load, or replace the faulty appliance.
Battery Switch and Electrical System Integration
Your travel trailer’s battery switch isn’t just a simple on/off switch; it’s a crucial component that manages the flow of power throughout your entire electrical system. Understanding its interaction with other parts is key to efficient and safe operation. This section details how the battery switch works within the broader electrical network of your RV.The battery switch acts as the central control point for your house batteries.
So, you’re planning a trip? Awesome! Don’t forget travel insurance – it’s a lifesaver. Check out Aon travel insurance for comprehensive coverage; they’ve got options for every budget and adventure level. And if you’re looking for another solid option, Aon travel insurance also offers great plans, so compare and choose what suits you best before you go.
Peace of mind is priceless, right?
Power from your batteries flows through the switch to various components. When the switch is on, power is available to the converter, which charges your batteries and converts 12V DC to 120V AC for your household appliances. If you have solar panels, they typically charge the batteries directly, but the switch still controls the power flow from the batteries to the rest of the system.
An inverter, which converts 12V DC to 120V AC for higher-power appliances, also draws power from the batteries, again, regulated by the switch. A faulty switch can disrupt this entire chain, leading to various problems.
Power Flow Through the System
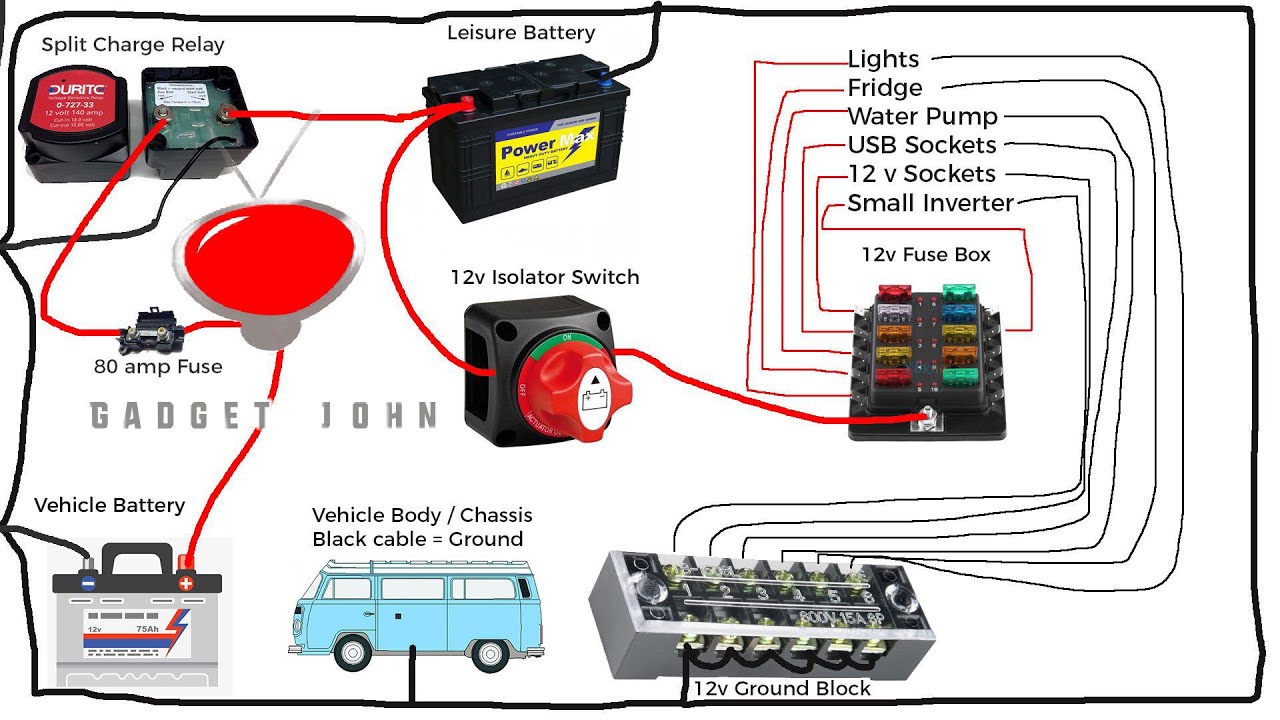
Imagine the battery switch as a traffic controller at a major intersection. When the switch is in the “on” position, power from the batteries flows freely to the different branches of your electrical system. Let’s trace a typical path: The batteries supply 12V DC power. This power passes through the battery switch. From the switch, power flows to the converter, which then supplies 120V AC power to your outlets.
Simultaneously, 12V DC power continues from the switch to directly power lights, water pumps, and other 12V appliances. Solar panels, when charging, add power to the batteries, which then passes through the switch and feeds the system, supplementing the battery’s own power. Finally, if you use an inverter, it draws power from the batteries (through the switch) to provide 120V AC for larger appliances.
Impact of a Faulty Battery Switch
A malfunctioning battery switch can cause a range of problems, from minor inconveniences to complete system failure. For example, a switch that doesn’t fully connect may lead to insufficient power reaching your appliances, resulting in dim lights, slow-running pumps, or appliances that fail to operate. Conversely, a switch that doesn’t fully disconnect could allow for battery drain even when the trailer is not in use, potentially leaving you with a dead battery when you need it most.
A short circuit within the switch itself could cause overheating, potentially leading to a fire hazard. In more extreme cases, a completely failed switch could cut off power to the entire system, leaving you without lights, water, or any other electrical functionality. This underscores the importance of regular inspection and maintenance of your battery switch.
Maintenance and Safety Precautions: Battery Switch On Travel Trailer Function
Keeping your travel trailer’s battery switch in top condition is crucial for reliable power and preventing costly repairs. Regular maintenance and adherence to safety procedures will extend its lifespan and ensure your safety. Neglecting these aspects can lead to dangerous situations and system failures.Regular inspection and cleaning are key to preventing problems before they arise. Corrosion buildup on the terminals and switch itself is a common issue, and it can significantly impede the flow of electricity, leading to poor performance or even complete failure.
Furthermore, loose connections can create resistance and generate heat, potentially leading to a fire hazard.
Battery Switch Inspection and Cleaning Schedule
A simple visual inspection should be part of your routine pre-trip checks. At a minimum, inspect your battery switch monthly, looking for signs of corrosion, loose connections, or damage to the switch itself. A more thorough cleaning should be performed at least twice a year, or more often if you notice any signs of corrosion.
- Monthly Inspection: Visually inspect the switch and terminals for any signs of corrosion (greenish or whitish buildup), loose connections, or physical damage. Check the switch’s operation to ensure it functions smoothly in both the “on” and “off” positions.
- Bi-Annual Cleaning: Disconnect the negative battery terminal first (always disconnect negative first!), then carefully clean the terminals and switch housing using a wire brush and baking soda paste. Baking soda is a mild abrasive and neutralizes acid buildup. Rinse with clean water and allow to dry completely before reconnecting the battery.
Safety Precautions When Working with Batteries and Battery Switches
Working with batteries and electrical systems always involves potential hazards. Following safety precautions is non-negotiable to prevent injury or damage.
- Eye Protection: Always wear safety glasses when working with batteries. Battery acid can splash and cause serious eye injury.
- Gloves: Wear gloves to protect your hands from battery acid and corrosion.
- Ventilation: Work in a well-ventilated area. Battery gases are flammable and can be harmful if inhaled.
- Disconnect Negative First: Always disconnect the negative (-) terminal first and reconnect it last. This minimizes the risk of accidental short circuits.
- Proper Tools: Use insulated tools to avoid electrical shocks. Never use metal tools that could conduct electricity.
Potential Hazards of Improper Use or Maintenance
Ignoring proper maintenance and safety precautions can lead to several hazards.
- Electrical Fires: Corrosion and loose connections can create resistance and generate heat, potentially leading to fires. This is particularly dangerous in enclosed spaces like a travel trailer.
- Battery Acid Burns: Improper handling of batteries can result in exposure to battery acid, causing skin and eye burns.
- Electrical Shocks: Working on the electrical system without proper precautions can lead to serious electrical shocks.
- System Failure: A poorly maintained battery switch can fail, leaving you without power in your travel trailer, especially inconvenient in remote locations.
Battery Switch Upgrades and Replacements
Upgrading or replacing your travel trailer’s battery switch can significantly improve your camping experience, offering enhanced functionality and reliability. This section details the process, benefits, and considerations involved in such upgrades. Choosing the right switch depends on your needs and budget, ranging from simple replacements to more sophisticated systems.
Upgrading to a More Advanced Battery Switch System
Upgrading your battery switch typically involves replacing your existing switch with a more feature-rich model. This might include moving from a simple single-battery switch to a multi-battery system with individual bank control, or upgrading to a switch with remote monitoring capabilities. The process generally involves disconnecting the power, removing the old switch, and installing the new one, ensuring all wiring is correctly connected according to the new switch’s instructions.
Careful planning and adherence to safety procedures are crucial throughout this process. For example, a switch with a digital display allows for precise voltage monitoring of each battery bank, while a remote-controlled system adds convenience, eliminating the need to access the switch physically.
Replacing a Faulty Battery Switch, Battery switch on travel trailer function
Replacing a faulty battery switch requires a methodical approach. First, disconnect the negative battery terminal to eliminate the risk of electrical shock. Then, using appropriate tools like screwdrivers and wire strippers (sizes depending on the switch and wiring), carefully remove the old switch. Take photos or make detailed notes of the wiring configuration before disconnecting anything to ensure correct reassembly.
Once removed, install the new switch, matching the wiring to the diagrams provided with the new switch. After connecting the wires, reconnect the negative battery terminal and test the switch to verify its functionality. Failure to follow these steps correctly could lead to electrical issues or damage to the system.
Comparing Battery Switch Upgrades
Several factors influence the choice of a battery switch upgrade. Capacity refers to the amperage the switch can handle; higher amperage is needed for larger battery banks and higher-power appliances. Functionality includes features like individual bank control, remote operation, and monitoring capabilities. Cost varies widely, from simple replacements costing a few tens of dollars to sophisticated systems exceeding several hundred.
For instance, a simple upgrade from a single-pole to a double-pole switch might cost around $50-$100, while a complete system with remote monitoring and multiple banks could cost several hundred dollars. Consider your budget and the specific needs of your travel trailer when making a decision. A higher initial cost may be justified if it improves system reliability and provides enhanced functionality.
Mastering your travel trailer’s battery switch is a fundamental skill for any RV owner. By understanding the different types of switches, safe operating procedures, and common troubleshooting techniques, you can confidently manage your power, prevent electrical issues, and enjoy worry-free adventures on the road. Remember to always prioritize safety when working with batteries and electrical systems.
FAQ Explained
How often should I inspect my battery switch?
Inspect your battery switch at least once a month, checking for corrosion, loose connections, and signs of damage.
What should I do if my battery switch is not working?
First, check fuses and connections. If the problem persists, consult a qualified RV technician.
Can I use a battery switch with different battery types (e.g., lead-acid and lithium)?
It’s generally not recommended. Consult your battery switch and battery manufacturer’s instructions.
What are the signs of a failing battery switch?
Signs include intermittent power, no power at all, unusual heating, or sparking around the switch.
